


Karaoke at Home

“I have been called the human jukebox, yes. But karaoke is not meant for people who can sing!”
— Carrie Underwood
Carrie Underwood is right! I’m not a good singer, but I love karaoke! Today we live in an urban condo and primarily do karaoke outside the home to be respectful of our neighbors. (We typically go to Voicebox Northwest. I am also a big fan of Karaoke from Hell, which is karaoke in front of a LIVE band!) Still, decades of suburban living made us fans of home karaoke. Even after giving away all of our old karaoke equipment to friends, I still keep up with what’s going on in this arena.
This interest prompted a question from a friend while we were in the UK over the Christmas holiday.
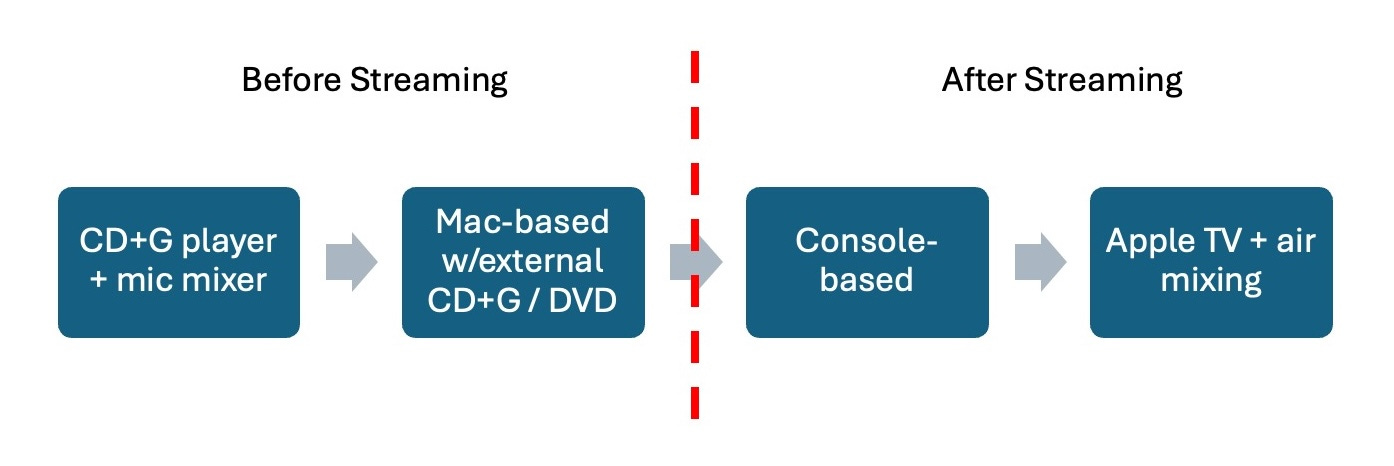
The B.S. era (Before Streaming)
I like to characterize my primary experience with home karaoke in the “B.S.” era — before streaming! This section is more of a reminiscence of ancient history, so feel free to skip it if you want to get to the good stuff!
This era involved CD+G and DVDs that we used to buy containing karaoke music. As with our other commercial music and movies, Marsha and I spent a lot of money on removable media containing our favorite karaoke tracks.
The audio equipment phase
In the first phase of this era, we owned some legacy “Pro KJ” equipment:
a karaoke CD+G / DVD player with mic inputs
UHF VocoPro wireless mic system (mixer, microphones, chargers)
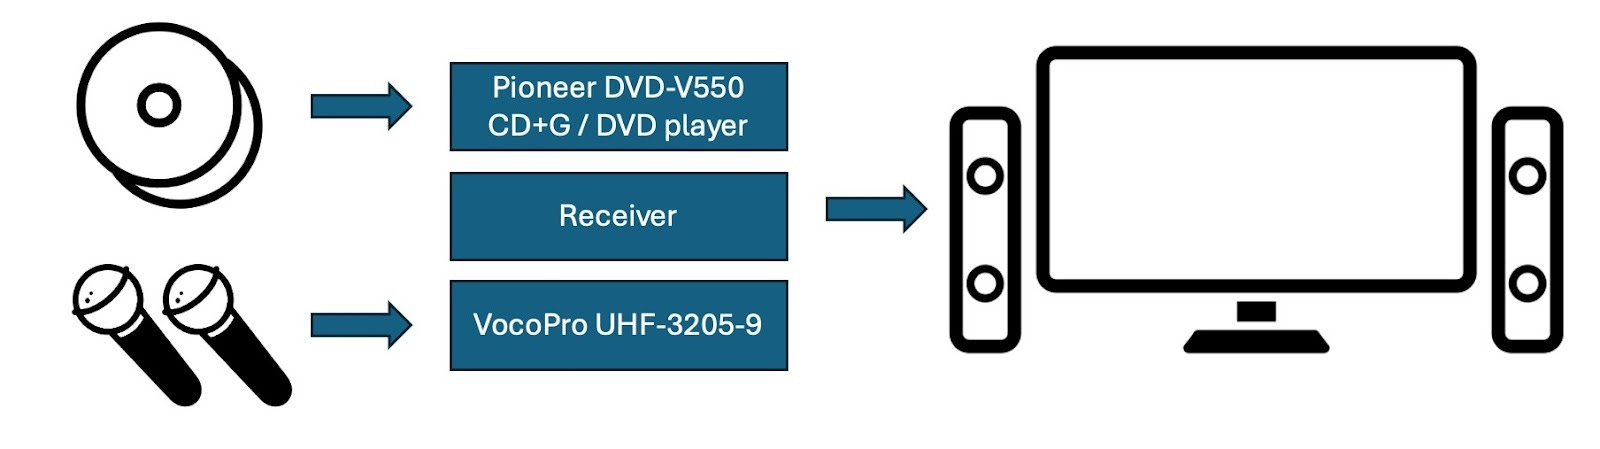
It was all pretty straightforward to hook the mic mixer into CD+G / DVD player mic inputs and to send the player’s mixed audio output through a normal stereo receiver. Before we had an A/V receiver, we just connected the player’s video output straight into the TV’s S-video input jack
The advantage to this setup was that the equipment could just stay hooked up all the time!
This setup was all pretty simple but had two problems:
The need to keep a Microsoft Access database with all the discs and tracks. We kept a binder for karaoke party guests with three different printed reports: a list of tracks by disc, list of songs alphabetized, and a list of songs grouped by artist. Every time we bought new media, we’d have to reprint the reports in the binder.
The delay during karaoke parties when changing discs!
The kJams for Mac solution
Ultimately, I swapped out the CD+G / DVD player and bought a disc drive that could read CD+G and DVD discs. There was a cool program on Mac called kJams that let me rip the CD+G discs and, with the assistance of Handbrake, supported karaoke DVDs, too.
So, the setup instead involved my old Macbook. It looked like this.
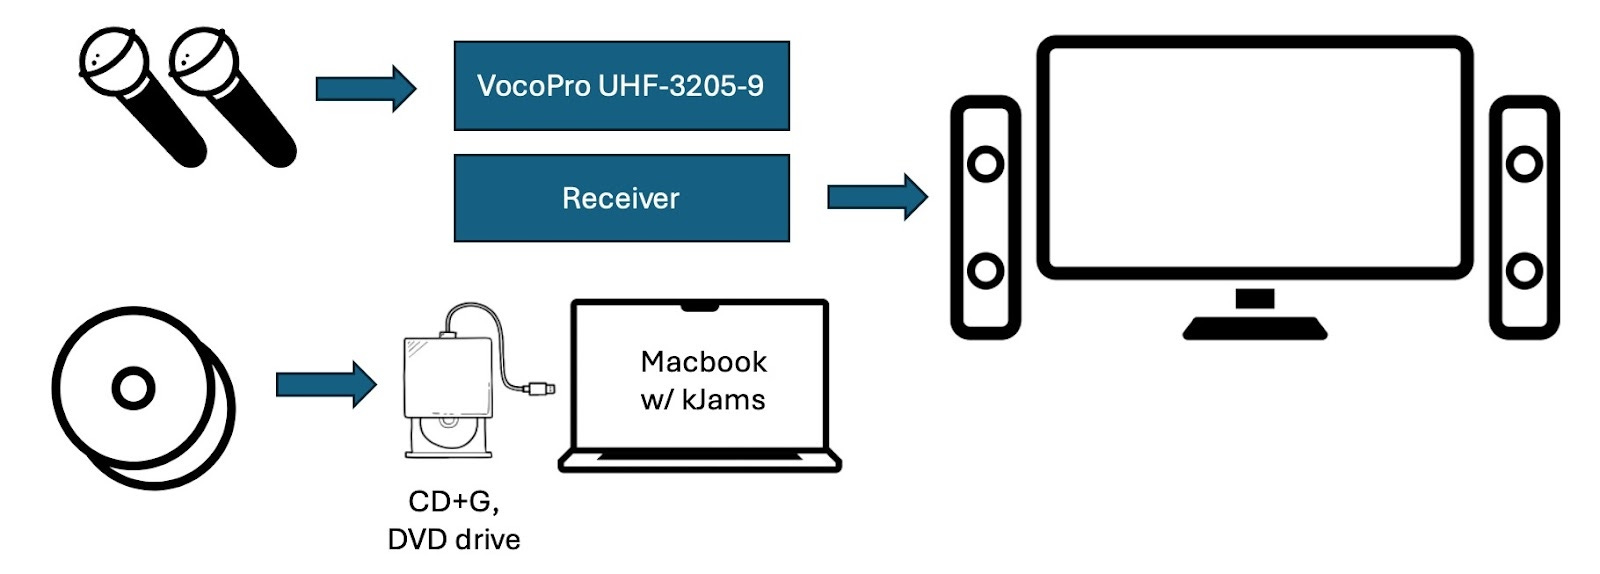
I bought a Plextor drive that supported CD+G and a USB enclosure for it to hook it up to my Macbook. (Today, you can buy drives easily off-the-shelf). kJams ripped all the CD+Gs and stored them in a library, not unlike iTunes at the time. I didn’t need the CD+Gs during the karaoke party!
I kept the wireless mics I had from the previous setup, and I could connect the mics into the mic jack for the Mac which handled the audio mixing. The mixed audio out from the Macbook went into the stereo receiver directly. I used a video adapter to connect the video out of the Macbook to the TV.
This setup removed the fumbling with CD+Gs when doing karaoke!
It was much easier to “search” for songs when playing ad hoc. No more fumbling with different CD’s!
Playlists could keep a karaoke session running continuously. No need to switch CDs!
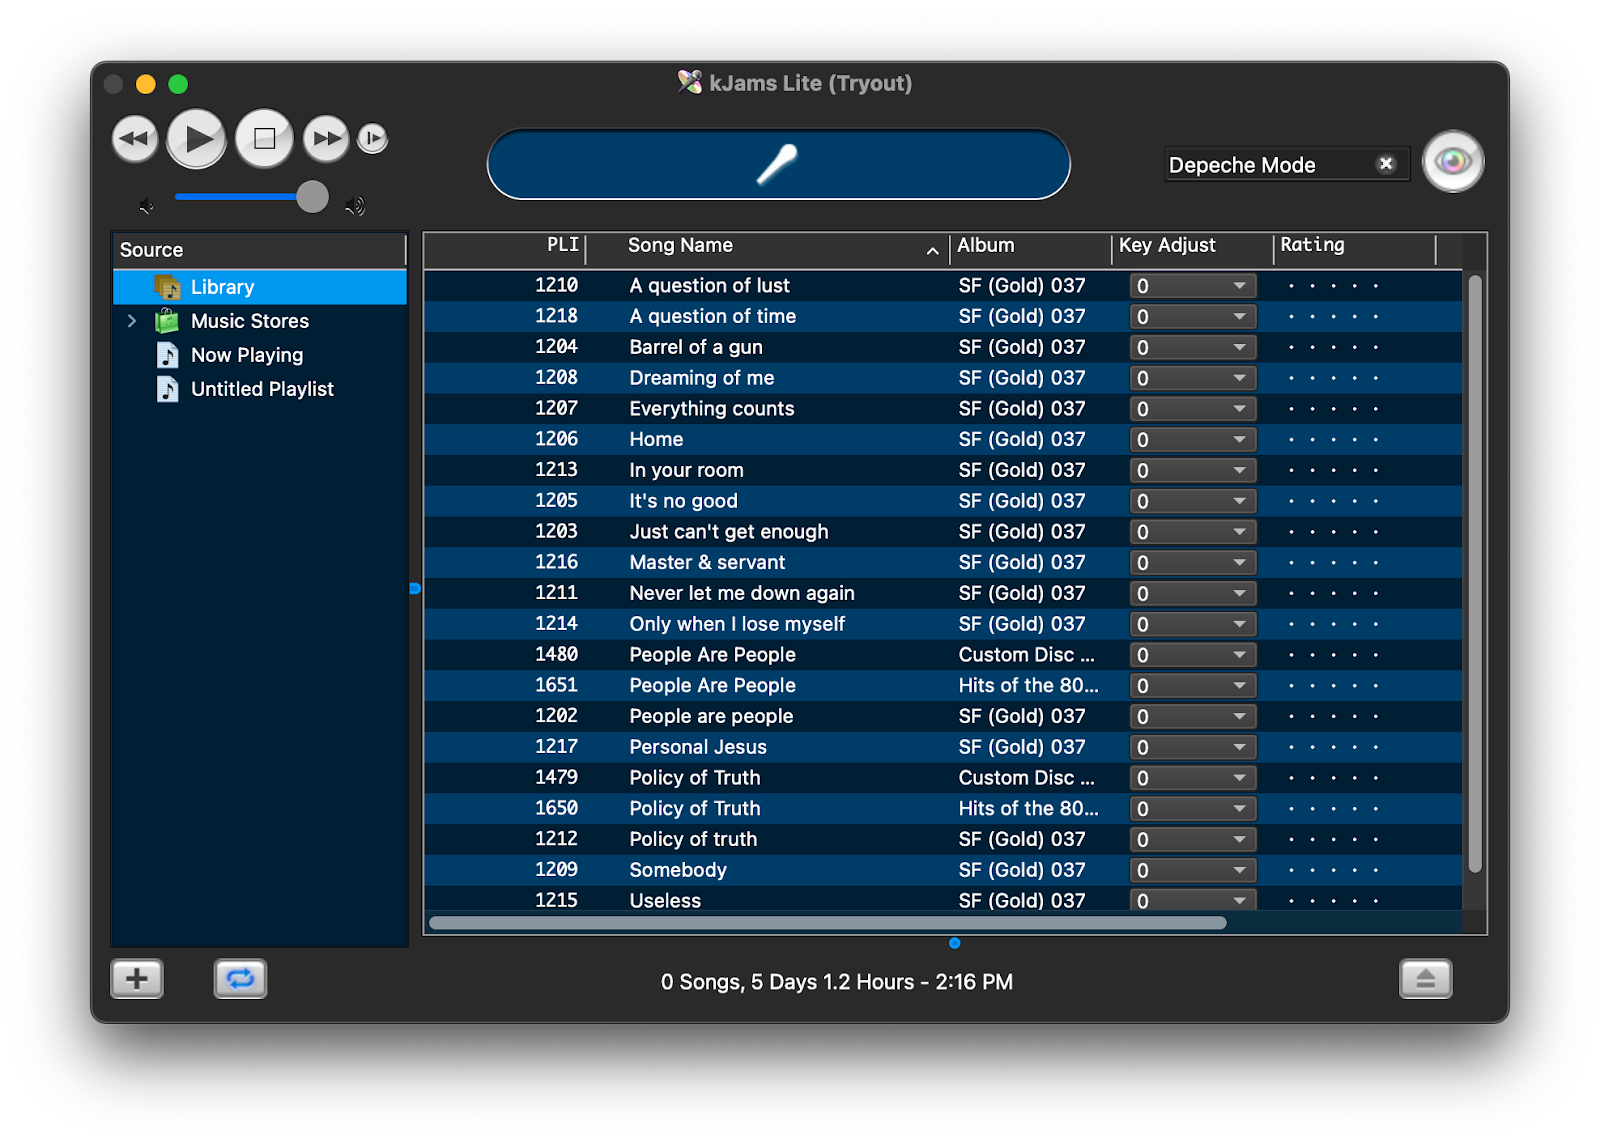
To write this article, I recovered my kJams library from backup, reloaded the software, and took a couple of screenshots of some searches. Here’s a search for “Depeche Mode” (my favorite band!).
Here’s a search for “Avril”. (Popular with my young daughters at the time!)

From there, it was easy to just play the songs!

This setup using an old Macbook is what my friend remembered when asking that question via LinkedIn!!
Of course, the downside here is that I didn’t leave my Macbook connected to the stereo and TV all the time, so there was always a bit of setup each time we wanted to sing.
It was also a pain to keep buying and ripping CD+Gs each time we wanted to update the music collection.
The modern era “After streaming”
Just as Spotify, Apple Music, and Netflix eliminated the purchase of CDs and DVDs for commercial music and movies, streaming also upended the CD+G and Karaoke DVD market. Most of this streaming revolution with karaoke happened after we left the suburbs, so most of these experiences are ones I’ve had using friends’ equipment and not my own!
YouTube and external consoles
Probably the most popular setups involving home karaoke today involve YouTube and external consoles like a JBL Partybox. With YouTube playlists, it became easy to have people submit their songs in advance and collaborate. Here is an example of a karaoke playlist shared with me by a friend:
https://www.youtube.com/playlist?list=PLGyjIvWZE1I2El3s7CJShuFkUKECmMoSv
When our friends have come over with an external console, I have used my Apple TV to stream YouTube and direct the audio via Bluetooth to the console. All the popular consoles support wireless mics. (In this scenario, I turn off the soundbar and subwoofer for the TV). The video with the karaoke lyrics goes to the TV, and the combined YouTube and microphone audio is mixed by the external console!!
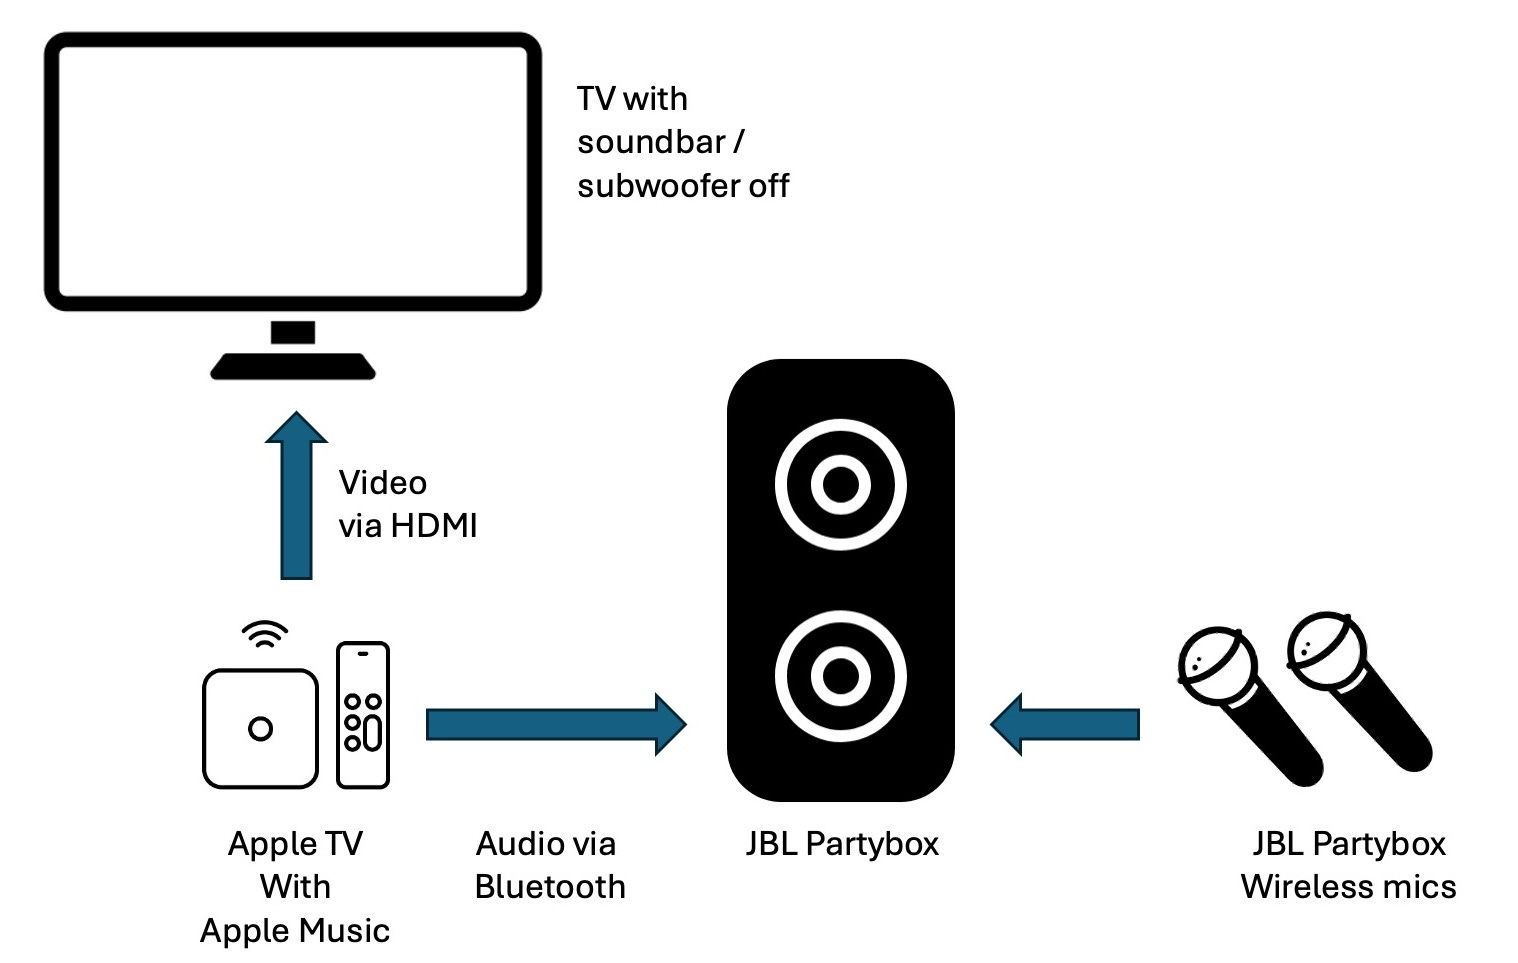
Of course, the obvious disadvantage to this setup is that there’s extra and large equipment with the external console like the JBL PartyBox that doesn’t normally get used with the TV. (We just normally use a soundbar and Bluetooth subwoofer with our TV nowadays.)
The less obvious disadvantage is that YouTube karaoke lists often involve ads! This isn’t too much of a problem, as sitting through the ads is often a good time to chat or drink!
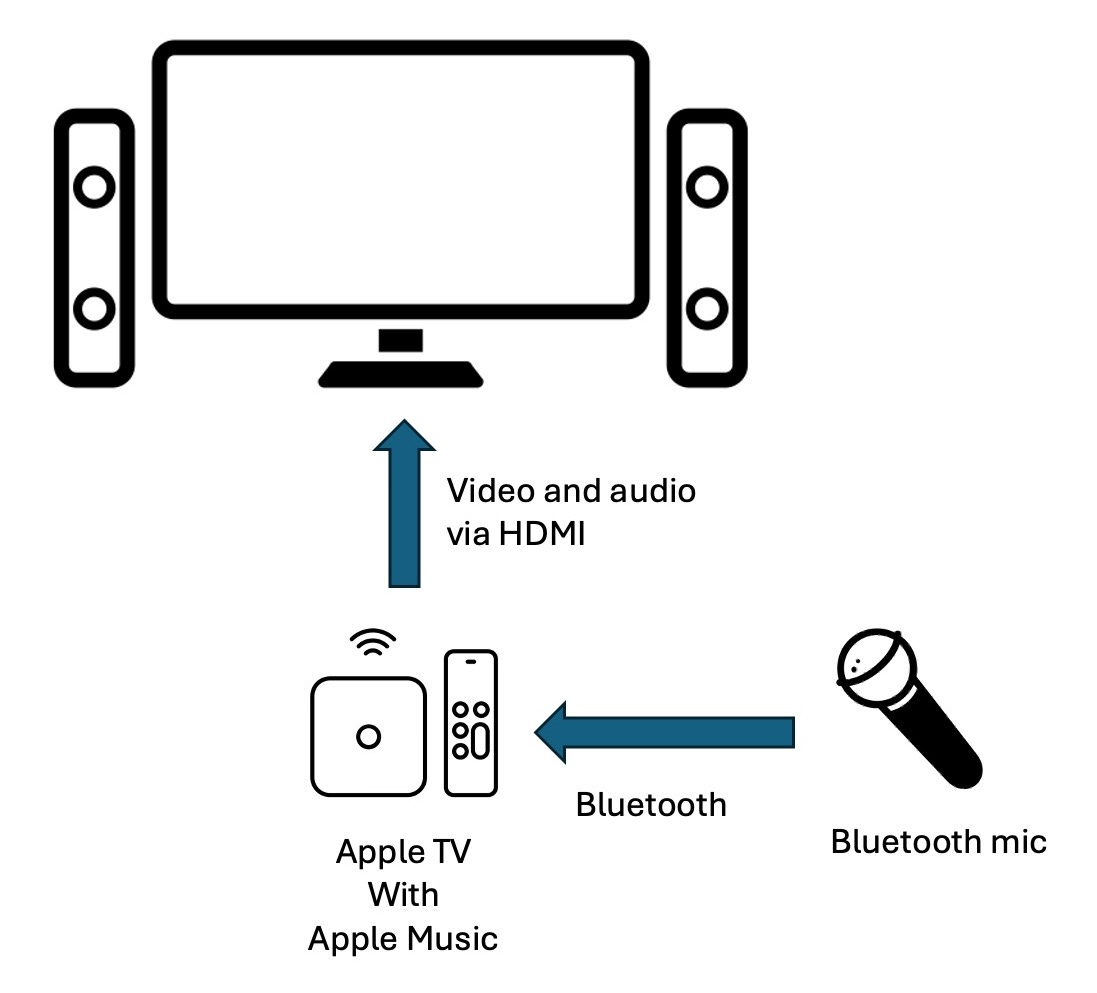
Apple Music Sing for Apple TV
Right now, I think the most streamlined solution for those bought into the Apple ecosystem is Apple Music Sing. We have a friend that has this set up all the time. It requires:
Apple TV 4K (3rd generation)
Bluetooth Mic (example)
The setup is straightforward, as it uses the existing setup for Apple TV with the existing A/V setup already set up to watch movies. The primary difference can be as simple as adding a Bluetooth mic, and the Apple TV can handle the sound mixing without any extra equipment!
Unlike dedicated karaoke tracks like with CD+G, DVD, and YouTube, Apple Music utilizes the actual background music from the artists. As such, this setup offers a superior music selection over the YouTube collections. There are also no ads, as the licensing is handled by Apple!
The downside is that by using the Apple TV as the mixer, the straightforward setup supports only one Bluetooth mic. Without a separate mixing board or an external console, this setup isn’t ideal for those looking to do duets! (Of course, it is possible to use an external console to handle the mixing for multiple microphones with Apple Music and Apple TV, too!)
Summary
I loved karaoke at home, and we found it was a very cool way to entertain both ourselves and guests. We don’t do it any longer at home just because we live in an urban condo with neighbors close by, but I strongly recommend home karaoke for anyone who still lives in a standalone home! It’s easy to get started, so hopefully this post provides a few ideas!
Do you have a favorite home karaoke setup that you’d like to share?